Showing posts with label Fun. Show all posts

11.11.2013

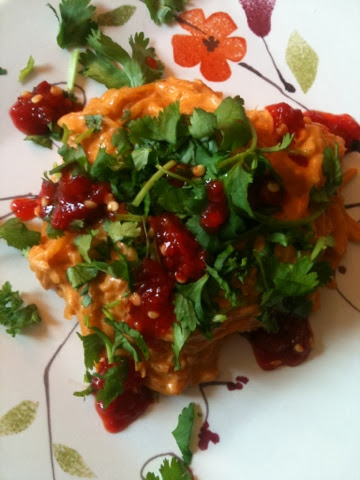
Red Curry Coconut Peanut Spaghetti Squash

I adore eating curries of all types.  Of course the best curries are those made entirely from scratch but sometimes that isn't an option.  What is great about this dish is it is fast, fun and easy to throw together.  You can make individual portions if you want to save some of the hearty squash for another application.  Just halve or quarter the ingredients and you are good to go.  It is a nice change up from having your curry over a traditional bed of Jasmine Rice and you get your pasta fix too, with less carbs.  This hearty dish is rich and satisfying and will have everyone swooning at it's complexity with such few ingredients.  Enjoy!

Red Curry Coconut Peanut Spaghetti Squash
1 Medium Spaghetti Squash
4 Tablespoons Red Curry Paste (Thai Kitchen, see photo)
2 Cans Coconut Milk
2 Tablespoons Coconut and Peanut Spread (Earth Balance, see photo)
1 Tablespoon Soy Sauce
Sambal (Chili Garlic Sauce), for garnish
Cilantro, for garnish

Cook Spaghetti Squash whole in oven on roasting pan for 1 hour at 400 degrees F or until tender, rotating once half way through.  Allow Squash to cool to touch. Slice in half long ways and scoop out slimy flesh and seeds.  Using a fork remove "Spaghetti" and put in a large bowl.  Over medium-low heat combine coconut milk, curry paste and coconut and peanut spread.  Whisk gently to combine.  Add squash to mixture and reduce heat to simmer, stir to combine and cook for 5-7 minutes.  Add soy sauce and remove from heat.  Serve immediately with garnish of sambal and chopped cilantro.  Allow unused portion to cool before refrigerating in a tightly sealed glass container.

Chef's note:  this dish stands on it's own but could certainly be varied by adding onions, carrots, peppers or your other vegetables of choice if desired.


10.30.2013

Sordough Starter Day 6

Well I am pretty confident that both of my starters are still alive.  I decided to add a combo of 3 flours, whole wheat, dark rye and white bread flour.  I have also been dumping out half the starter as needed.  There are bubbles forming and both starters have a nice fermented aroma.  I will keep you updated and am so looking forward to making my first loaf of sourdough.  Happy Hump Day Universe. Let all great things come to those who wait!


10.26.2013

Sourdough Starter Day 3

Alright folks I have been feeding my sourdough starter twice a day and I also started one using just whole wheat flour instead of a combination of wheat and dark rye.  On day one I fed them equal parts of whole wheat flour and water (about 1/2 cup each).  Now, today, day 3 I fed them both unbleached white bread flour.  They are both covered on top of my fridge and getting bubbly and fermenting.  I am so looking forward to making some delicious, rustic sourdough breads but for now, the wait is on!  Stay tuned beloved readers.  This one should be well worth the wait!!!


10.24.2013

Bread Machine French Bread

Do you have a bread machine?  Do you use it?  I use mine all the time because it makes making homemade bread so EASY!  I makes homemade rolls, pizza crust, pita bread and more.  Today I am tackling a basic french bread recipe.

The inspiration for this recipe came after watching an episode of Top Chef New Orleans where the teams were charged with cooking Vietnamese cuisine.  Great episode that left me drooling for some crusty french bread drenched in butter.

Upon researching a recipe for Banh Mi Tay, I discovered this gem of a site -http://www.vietworldkitchen.com/blog/2007/05/vietnamese_bagu.html
I decided to give the recipe a go in my bread machine and see how it came out.  Although I don't mind making my own "loaves" I figured I'd let the bread machine do all the work today.

Bread Machine French Bread - (Vietnamese Baguette Recipe borrowed and adapted from http://www.vietworldkitchen.com blog, see link above)

1 1/2 cups warm water
1 package active dry yeast (or 2 1/4 teaspoons active dry yeast)
1 Tablespoon granulated sugar
3 1/2 cups unbleached bread flour (or all-purpose)
1 1/2 teaspoons sea salt

Add all ingredients to bread machine in the order listed (or according to your bread machine recommendations and set for basic bread cycle.  Remove when cooking cycle completes and allow to cool uncovered for at least an hour before slicing.  If you try to slice bread when it is hot/too warm, you will end up crushing the beautiful masterpiece you have just created so have a little patience.  I promise it will be worth the wait!  Serve toasted with lots of vegan butter.

Chef's note:  If you prefer to form your own loaves, set bread machine for "dough" and remove and form your own loaves to bake in your oven.  After forming two loaves, allow loaves to rise covered with a tea towel for 40 minutes.  Cut three slits in loaves (not just pretty but allow steam to escape) and bake at 450 degrees F for about 25 minutes.  Cooking times may vary based on your oven and size of your loaves.  Be sure to let bread cool to room temperature before slicing so you don't end up with a gummy mess.


10.12.2013

Fresh Falafel Balls

1 cup prepared chickpeas*
1 medium yellow onion
2 cloves fresh garlic
2 tablespoons fresh curly parsley
2 tablespoons fresh cilantro
1 teaspoon Sea Salt
1 teaspoon black pepper
1 teaspoon coriander
1 teaspoon cumin
2-3 tablespoons flour
Olive oil for frying

Start this recipe a day ahead by soaking dried chickpeas for 24 hours in cold water.  

Blend all ingredients (except flour) in food processor until a paste forms.  Add flour and pulse once more till combined.  Refrigerate for about 1 hour.  Remove mixture and scoop heaping teaspoon size balls (roll to form).  Fry in batches of shallow olive oil until crisp.  Remove, sprinkle with a dash of sea salt and allow to cool on parchment paper for about 5 minutes before serving.  

Serve with creamy hummus, arbol chili sauce and any other toppings of choice such as fresh cucumber and tomatoes.

10.10.2013

Arbol Chili Sauce

3 dried Arbol Chilies
2 cups Water
1 six-ounce can Tomato Paste
3 cloves fresh Garlic
1 Tablespoon ground Cumin
1 teaspoon Sea Salt
1/4 teaspoon Black Pepper
1 teaspoon dried Oregano
2 Tablespoon Sugar

In a small saucepan cover dried chilies (stems removed) with 2 cups water. Cover and bring to a boil, cook for 5 minutes.  Turn off heat and allow to sit for 5 minutes. Add contents of pot to blender with other ingredients and blend on high speed until well blended.  Arbol Chili Sauce can be served warm, room temperature or cold.  Use sauce immediately or store unused portion in tightly sealed glass vessel in refrigerator for up to one week.  Pairs well with hummus, tamales and so much more!


9.02.2013

Crazy Easy Tamale Cake with Fire Sauce

I love tamales. I could probably eat them every day and never tire of them. I remember being a child and my Mom used to feed us cans of Hormel Tamales and they were amazing. Do they even make those anymore? Tamales are so versatile and can be made from scratch in a snap. There is no limit to the number of fillings and toppings so the opportunities for creativity are infinite. Now don't get me wrong, making individual tamales for large supper parties with complex fillings can be VERY labor intensive but there are some fun shortcuts when you just want tamales and you want them now.

Crazy Easy Tamale Cake with Fire Sauce

Tamale Cake
2 cups Masa Harina (corn flour)
1 teaspoon salt
1 teaspoon baking powder
2/3 cup canola oil
1 1/4 cups vegetable broth

 Begin by combining your dry ingredients, Masa Harina, salt, baking powder and salt until fully combined. Next add the oil and mix together. Now slowly add in the vegetable broth and mix until all ingredients are well combined but DO NOT OVERMIX. Now take out a small casserole dish(glass or metal)and line it with tin foil allowing some to hang over the sides of the dish so you can "wrap it" over the top. Put a layer of parchment paper down and spread mix on parchment. Using another piece of parchment paper the size of the dish, press down slightly so that you have an even layer of dough. Leave that parchment on top and wrap foil over top. Add another couple layers of foil on the top of the dish so that there are no leaks. Next step is to place this dish in the middle of a larger dish. Now place in the oven (no need to preheat oven, it's easier to make your water bath if you are not fighting with a scorching hot vessel) and POUR water all around the dish so that it comes up to about half way. Now cover the whole thing in more foil so it is sealed and cook for about 40 minutes at 350 degrees F.  While it is cooking, make your Fire Sauce.

After your timer goes off, remove from oven and very carefully remove outer foil and lift smaller dish out and set on counter to cool for about 10 minutes. Be very careful because there will be a lot of steam trapped in this contraption! Remove your tamale cake and slice into desired sizes. This is especially great for kids because you can give them smaller portions if necessary.

 ***This recipe does not use filling, although I did throw a few raisins on top because I thought my kids would enjoy them. The beauty of tamales is you can easily make the tamale and then your "fillings" can just be toppings, it still tastes the same. Think beans, potatoes, and any array of vegetables you like, and of course, don't forget the fire sauce! Be creative. If you want to "fill" these, just double the recipe and layer your filling in between and add 20 minutes cook time***

Fire Sauce
1 can tomato paste
1 red hot chili (dried or fresh with stem removed)
2 cups water
2 cloves fresh garlic
2 Tablespoons sugar
1 teaspoon dried oregano
2 teaspoons ground cumin
1/2 teaspoon salt
1/4 teaspoon black pepper

Combine all in your high speed blender and then warm in a sauce pan for serving. Be sure to cover your blender with a towel and keep your hand on the top to avoid a tomato explosion in your kitchen. Trust me on this one. Serve immediately with your tamale cake and store any unused portion in refrigerator in a tightly sealed glass vessel for up to one week. ENJOY.


8.07.2013

Home Skillet Ketchup

At my house we go through A LOT of ketchup.  I always thought making your own must be pretty difficult but I proved myself wrong.  Next time you have a hefty batch of ripe tomatoes sitting around, give it a try.  You might surprise yourself and your loved ones!

Home Skillet Ketchup
8 medium tomatoes
4 fresh green beans
3 mini bell peppers (red, orange, yellow)
1 medium yellow onion
3 cloves fresh garlic
1 inch knob fresh ginger
1 cup balsamic vinegar
1/2 cup brown sugar
2 Tablespoon soy sauce
4 whole cloves
1 Tablespoon sea salt
1 teaspoon black pepper
1/2 teaspoon ground cinnamon
Splash of red wine (optional)
1 cup water
Olive oil (for sauteing)

Finely chop and saute onion, garlic, bell peppers, ginger and green beans in a little olive oil over low heat until cooked through.  Add chopped tomatoes and continue cooking for about 10 minutes.  Add all remaining ingredients and cook over very low heat for 1 hour or more.  Taste test for seasoning level.  Allow mixture to cool and remove whole cloves if possible.  Blend mixture in high speed blender until smooth.  Add a little water if mixture seems too thick.  Put ketchup in an airtight glass container and refrigerate until ready to use.


6.10.2013

Toasted Sesame Cashews

Fast, easy, versatile and fun to make.  Goes well a top your favorite rice and stirfry dishes.  Whip up a batch and have fun with your food.

Toasted Sesame Cashews
1 cup raw Cashews
1 teaspoon Toasted Sesame Oil
1 teaspoon Soy Sauce or Tamari
Dash of Sugar
Dash of Sea Salt

Preheat oven to 400 Degrees F.  Toss Cashews in all seasonings listed above and spread out on a cookie sheet.  Bake for 10-12 minutes (tossing halfway through) until Cashews are golden.  Allow to cool.  Eat and enjoy!